
Code-free Healthcare Analytics in Synapse
One of the recent additions to the Azure Cognitive Services suite is called Text Analytics for Health. The goal for a health-focused Text Analytics service is to extract healthcare-related metadata from a given text. Some examples are; the ability to extract medication names, mentions of diagnosis and treatment options, symptoms or signs, etc. What if you have some data in your data warehouse and would love to enrich it by extracting the medical information for further analysis?
You might have heard of the built-in Cognitive Service integrations in Synapse. Unfortunately, for now, those are limited to Anomaly Detector and Sentiment Analysis. The team at Microsoft might be working on more integrations, and at any point, this blog post might go stale! Still, it is worth investigating if we can find a workaround to implement Healthcare Analytics or any Cognitive Service into a Synapse Pipeline with a little bit of additional work on our end.
Sample Data Set
We will be using a COVID dataset that contains 600+ patient and doctor dialog transcriptions for our lab environment. The content should give us a good amount of medical information when analyzed with healthcare analytics. The original data is hosted here on Github. To make things a little bit easier, I have converted the dialogues into smaller JSON files easier to parse and query. You can find all the JSON files on Github as well.
Requirements
Before we start, here are some requirements to get prepared for our implementation.
- You have to get yourself an Azure Cognitive Service account and self-host Text Analytics as a container. The self-hosted version offers the ability to synchronously call the APIs, simplifying our implementation in the Synapse Pipeline. The web-based APIs of the service does offer only asynchronous execution. With that said, you can host the container in Azure. That's precisely what I had running writing this post. This link can help you land on the resource creation page on the Azure Portal. For options on how to host Cognitive Services on a container visit here.
- Upload all the JSON files into a folder named covid under a file system named dev in an Azure Data Lake Storage Gen 2 resource linked to your Synapse Workspace.
- Oh yes, you do need a Synapse Workspace / Environment.
With all this preparation, we should be good to proceed.
Reading the files
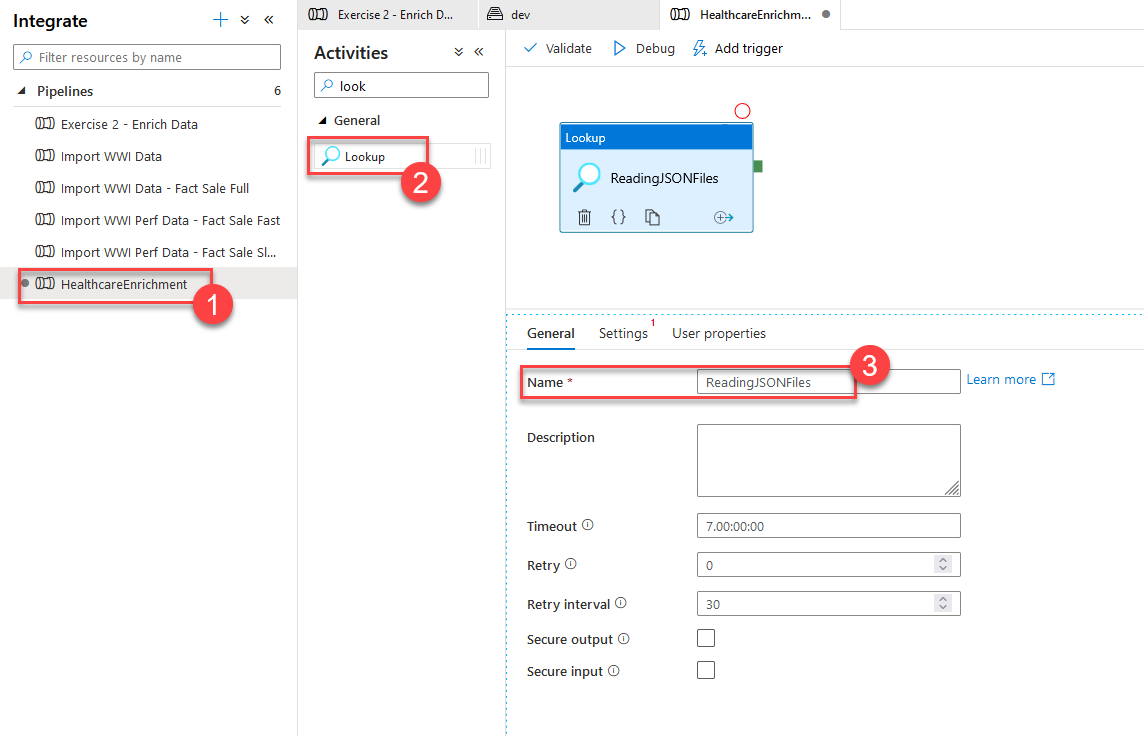
The first step is to create a new Pipeline in Synapse. In my case, I have named it HealthcareEnrichment (1). We will add a Lookup (2) activity and name it ReadingJSONFiles (3).
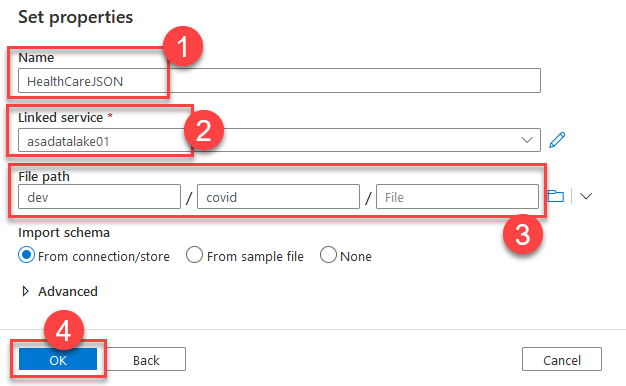
Now switch to the Settings tab and create a new Dataset for the Source dataset. Select Azure Data Lake Storage Gen2 followed by JSON format. On the final step, name the dataset HealthcareJSON , set the linked service to your ADLS Gen 2 (2), and pick the file path where you have uploaded the JSON files (3).
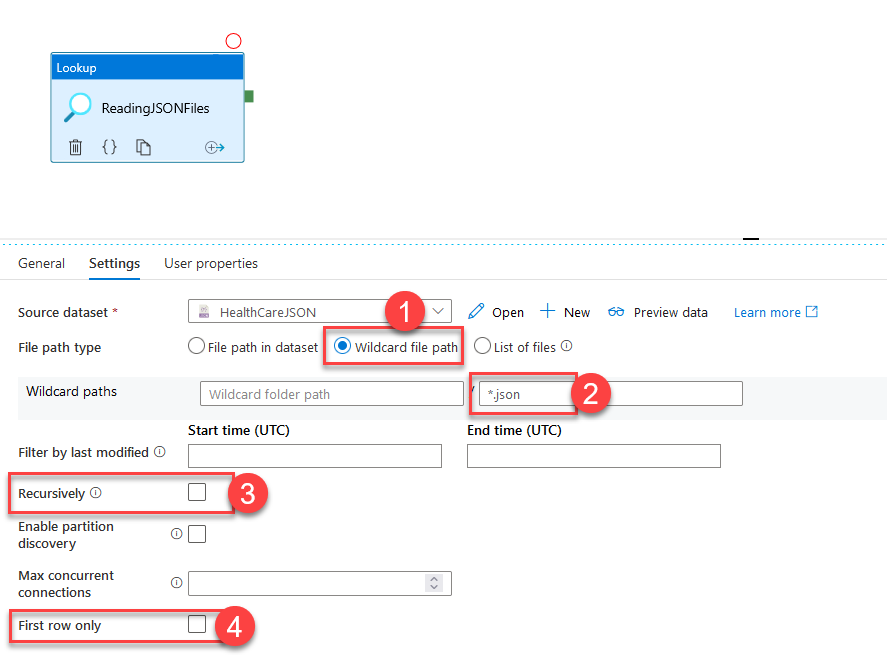
When you are back on the Settings tab for the Lookup activity, select Wildcard file path (1) and make sure *.json (2) is the pattern. Finally, disable Recursively (3) and First row only options to make sure we are safe just in case.
You can select the Preview data option to get a peek into your data and ensure the access is set correctly.
Iterating the files
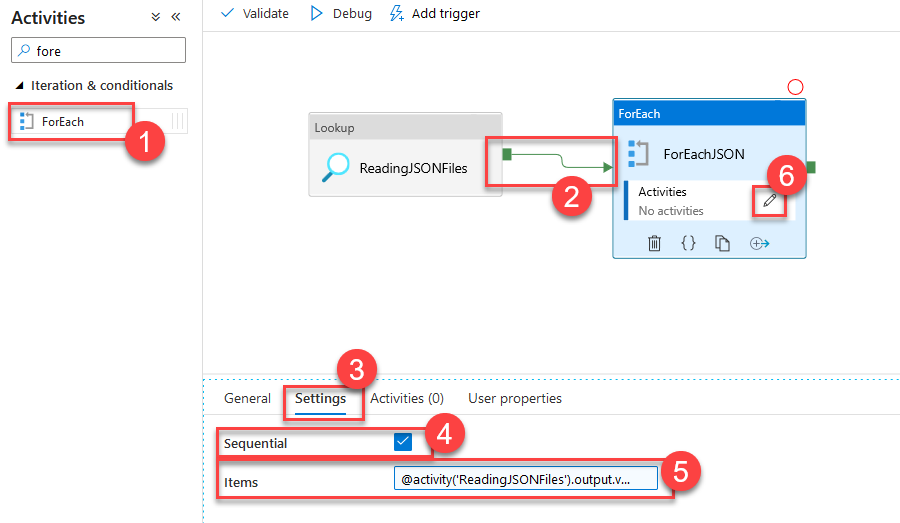
Now we have to iterate through the files to call the Cognitive Service one by one. For that, we will bring in a ForEach (1) activity. Make sure the activity is connected to the ReadingJSONFiles activity with an arrow so that it waits for it. Switch to the Settings (3) tab and turn on Sequential (4) reading. We can do batch as well, but that would complicate our implementation in the loop. For the sake of simplicity, we will go sequential. Finally, select Add dynamic content for the Items collection and type in @activity('ReadingJSONFiles').output.value (5). This line helps us get the result from our previous read activity and pass it to the ForEach activity to loop through. Select the edit button (6) in the Activities box in the ForEach activity to scope into the ForEach loop.
Calling Text Analytics for Health
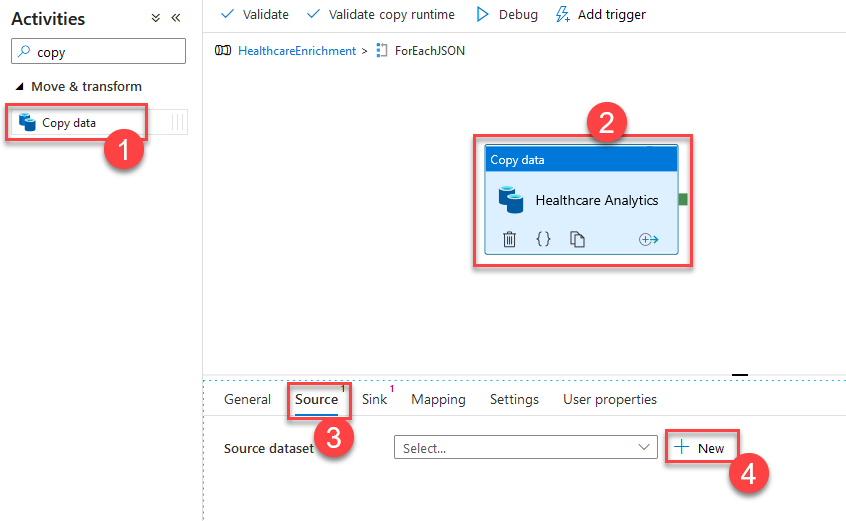
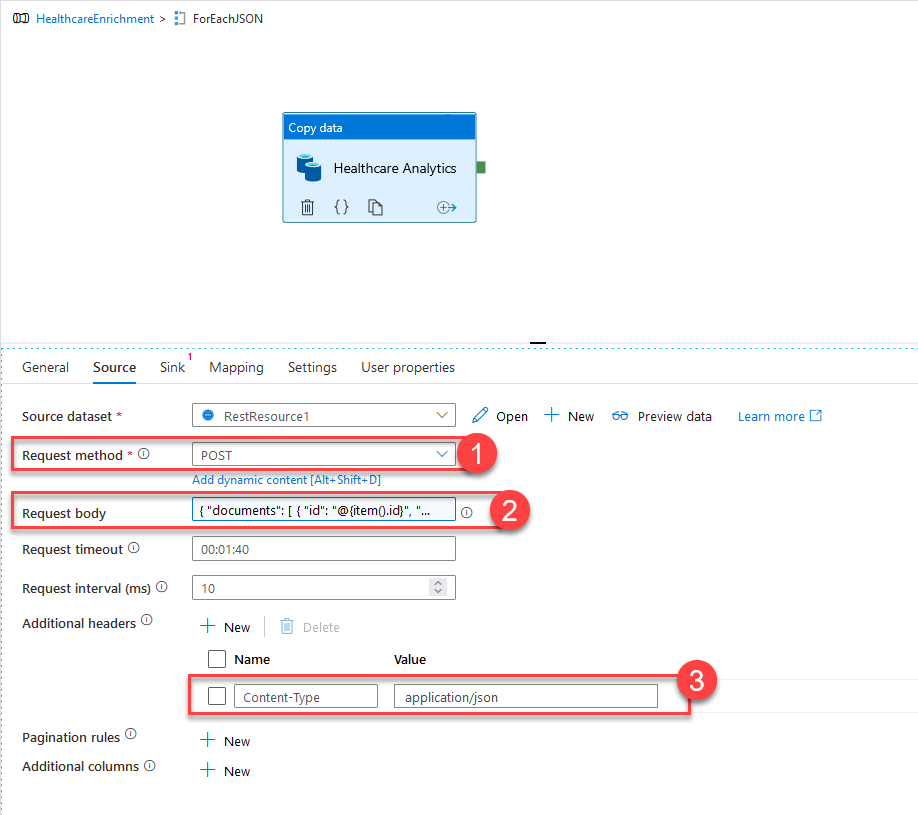
Once you are in the ForEach activity, drag and drop a Copy data activity, we will use the Copy data activity to call a REST Data Source to copy its HTTP output and store it in the data lake. In my case, I named the copy data activity Healthcare Analytics and in its source tab (3) selected +New to add a new data set.
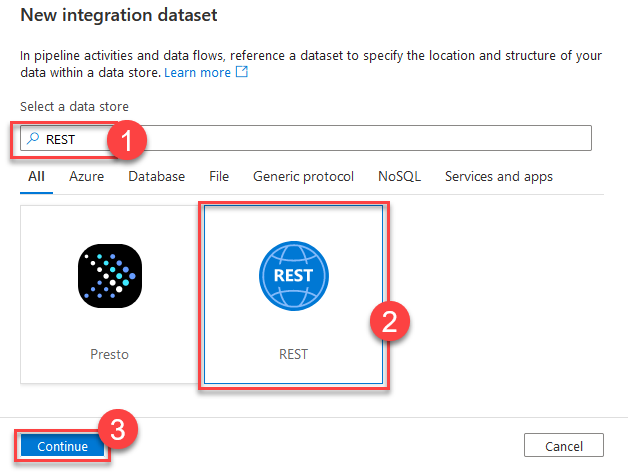
Our new integration dataset will be REST-based. Search for REST (1), select it and Continue (3).
When you select Continue , you will find yourself back in the ForEach loop. Select Open to open the new source dataset. We have to configure its linked service as it is missing. Select +New to create a new linked service for the REST dataset.
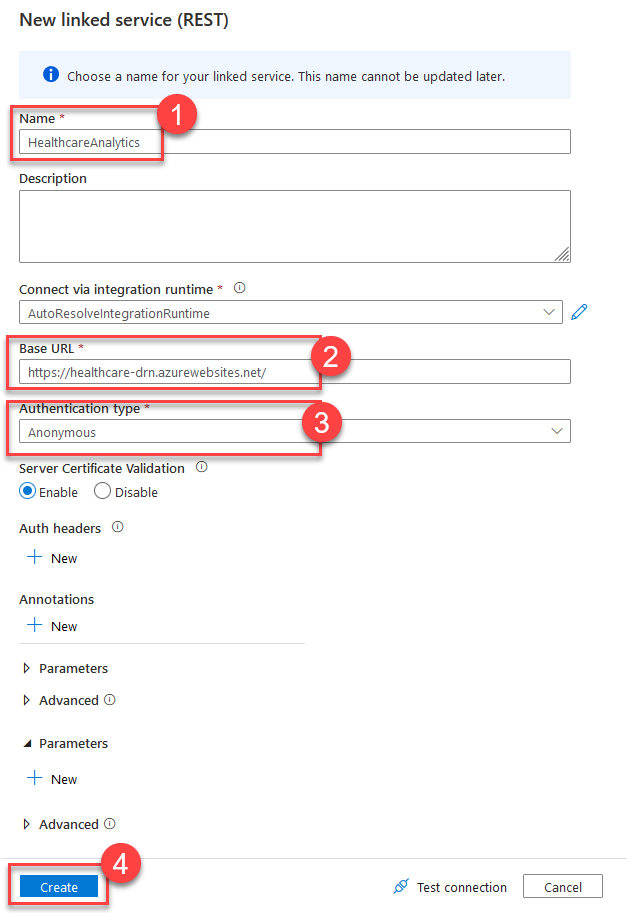
When creating the new REST Linked Service, name, it HealtcareAnalytics and provide the Base URL that is the endpoint of your Cognitive Services container. Set Authentication Type to Anonymous (3) for now. As your container does not have any authentication, I suggest putting the container into the same virtual network as your Synapse environment.
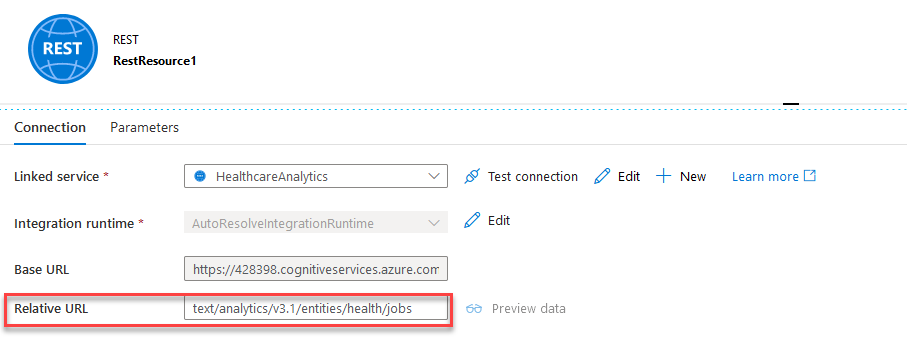
When you are back on the Rest Resource page, set the Relative URL to text/analytics/v3.1/entities/health/jobs to complete the base URL from the linked service to craft the final REST Endpoint we have to hit.
Go back to the pipeline page and add some more settings for the Copy data activity in the ForEach loop. Request method will be set to POST (1). For Request Body (2), you will select Add dynamic content and copy-paste the code below.
{
  "documents":[
    {
      "id":"@{item().Id}",
      "language":"en",
      "text":"@{item().DialogueText}"
    }
  ]
}
This code will build the appropriate request body for Cognitive Services by merging the Id and DialogueText fields of the JSON documents we have as our source. Finally, add a new header to set Content-Type of the HTTP request to application/JSON (3).
Storing enrichment data
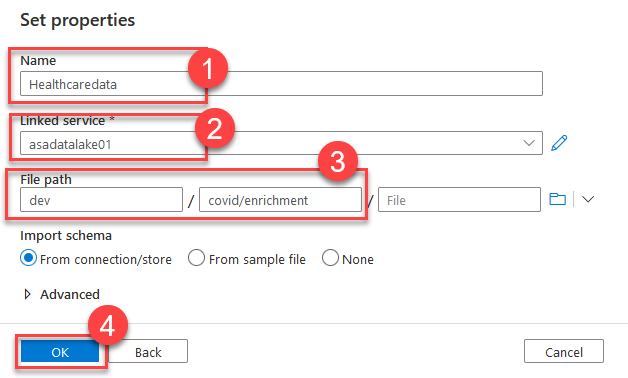
Now it is time to define where the output of the analysis will be stored. Switch to the Sink tab of the Copy data activity and select +New to create a new dataset. For your new dataset, select your ADLS Gen 2 and JSON as the data format. Set the name of the new dataset to Healthcaredata (1). Select your ADLS Gen 2 linked service. Finally, set the path to a folder where you want to store the results (3). In my case, I have created a new folder under covid and named it enrichment. Select OK to continue.
Running the pipeline
It's time to hit that big Publish Now button in your Synapse workspace to push all the changes and save them. Now you can run your pipeline and monitor the output folder in the data lake.
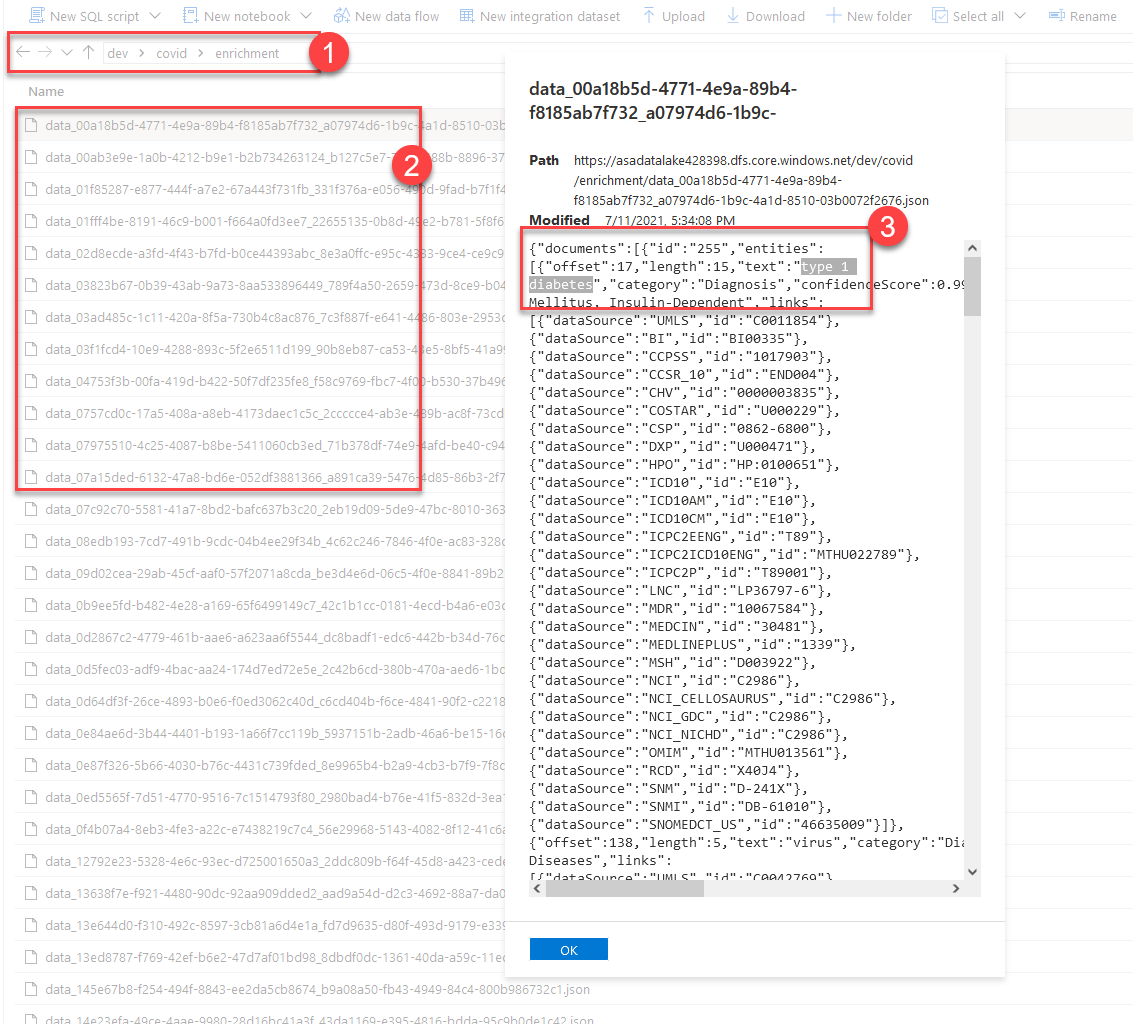
In the above screenshot, you can see all the detailed results saved into separate files containing vast amounts of additional metadata related to the dialog files we fed in. It is up to you to query the data with either the built-in SQL engine or Spark to further reshape the data in the same pipeline.
Conclusion
The workaround we have implemented here works pretty much for all serverless and code-free AI services that expose REST APIs. You don't have to wait for the out-of-the-box integration. You can start using pretty much all of the Cognitive Services features in Synapse right now. I hope this was a nice read and a good trick to keep in mind. See you at the next one.
Resources
- How to call the Text Analytics REST API
- How to: Use Text Analytics for health
- Install the container using Azure Web App for Containers
- Text Analytics API (v3.1) REST Documentation

The first step starts with you
Get in touch!
The bigger the challenge, the more excited we get. Don’t be shy, throw it at us. We live to build solutions that work for you now and into the future. Get to know more about who we are, what we do, and the resources on our site. Drop a line and let’s connect.